Frozen pipes can lead to costly repairs and significant water damage. When temperatures drop below freezing, water inside pipes can expand and cause them to crack, flooding your home. Here’s a quick summary of how to prevent this:
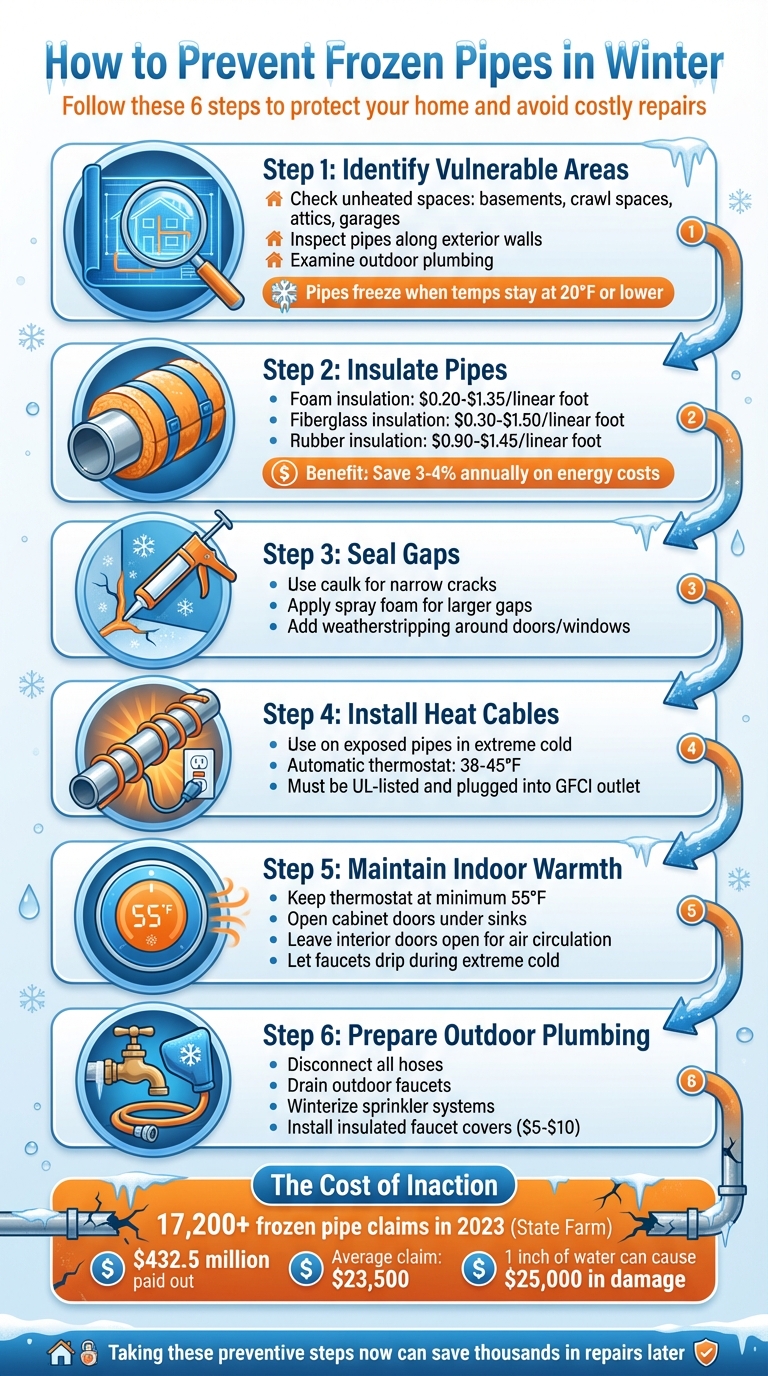
- Identify vulnerable areas: Check unheated spaces like basements, crawl spaces, attics, and garages, as well as pipes along exterior walls and outdoor plumbing.
- Insulate pipes: Use foam, fiberglass, or rubber insulation to protect exposed pipes.
- Seal gaps: Close drafts near windows, doors, and vents to keep cold air out.
- Install heat cables: Use heat cables on exposed pipes for extra protection.
- Maintain indoor warmth: Keep your thermostat at or above 55°F and open cabinet doors to let warm air circulate around pipes.
- Prepare outdoor plumbing: Disconnect hoses, drain outdoor faucets, and winterize sprinkler systems.
Taking these steps can save you thousands of dollars in repairs. If a pipe freezes or bursts, shut off the main water supply immediately and seek professional help.
6 Essential Steps to Prevent Frozen Pipes in Winter
How Do I Prevent My Pipes from Freezing? | 5 Easy Tips
Finding Vulnerable Areas in Your Home
To protect your home from plumbing issues, it’s important to identify the areas most at risk. Not all plumbing is equally exposed to cold temperatures, so pinpointing these weak spots now can help you focus your efforts where they’ll count the most.
Where Pipes Freeze Most Often
Begin your inspection in unheated spaces like basements, attics, crawl spaces, and garages. These areas lack consistent heating, making them especially prone to freezing when temperatures drop. Don’t forget to check plumbing in kitchen and bathroom cabinets along exterior walls - closed cabinet doors can trap cold air, leaving pipes more exposed .
Pipes running along exterior walls are another common trouble spot. If insulation in these walls is insufficient or missing, pipes are left vulnerable to the cold. Pay extra attention to pipes on the north side of your home, as they get less sunlight and stay colder longer. Also, inspect areas near foundation vents, drafty windows, or doors where cold air can sneak in through small gaps .
Don’t overlook your outdoor plumbing - hose bibs, outdoor spigots, sprinkler lines, and swimming pool supply pipes are directly exposed to freezing temperatures. These components are often the first to freeze as the weather turns harsh. According to Matthew Ceperley, a plumber with Aiello Home Services:
"Homes heated with hot water systems face higher risks because those pipes are typically located on the exterior of houses and made from thinner materials".
Keep in mind, pipes don’t freeze instantly at 32°F. However, when temperatures stay at 20°F or lower, the risk becomes serious. Pipes in unheated crawl spaces or along exterior walls can freeze in minutes under the right conditions . Once you’ve identified these vulnerable areas, make sure to locate and mark your water shutoff valves so you’re ready to act if a pipe bursts.
Locating Your Water Shutoff Valves
After identifying at-risk pipes, the next step is to locate your water shutoff valves. Knowing where these are can significantly reduce damage if a pipe bursts. Your main water shutoff valve is typically found where the main water line enters your home or near the water meter.
Mark the valve clearly with fluorescent paint or tape so it’s easy to find, even in low light or during an emergency. Make sure everyone in your household knows where it is and how to operate it. If the valve is located outside, keep a pipe wrench or crescent wrench nearby for quick access.
You should also locate and label the shutoff valves for sinks, toilets, and other fixtures. These smaller valves allow you to shut off water to specific areas without cutting it off throughout the entire house. It’s a simple step that can turn a plumbing emergency into a manageable situation.
Insulating and Sealing Pipes
After identifying pipes that are at risk, the next step is to insulate them and seal any gaps where cold air might seep in. Insulation acts as a protective layer around your pipes, while sealing ensures that cold drafts don’t compromise that protection.
Choosing the Right Pipe Insulation
The type of insulation you need depends on where your pipes are located and the kind of water they carry. For cold water pipes in basements, crawl spaces, or outdoors, foam insulation is a solid choice. It’s affordable, with prices ranging from $0.20 to $1.35 per linear foot, and it comes with self-sealing adhesive and mold-resistant properties, making it easy to install and maintain. However, foam isn’t ideal for hot water pipes.
If you’re dealing with very hot water pipes or pipes in fire-prone areas like unfinished attics, fiberglass insulation is a better fit. It costs about $0.30 to $1.50 per linear foot and is both fire-resistant and excellent at retaining heat. Keep in mind, though, that fiberglass is less flexible and can irritate your skin during installation.
For spots that are hard to reach or for pipes requiring extra flexibility, rubber insulation is a great option. It’s priced at $0.90 to $1.45 per linear foot, offers mold resistance, and is easy to maneuver into tight spaces.
When selecting insulation, look for products with a higher R-value - this measures the material’s insulation strength. For outdoor pipes, choose insulation that’s at least 3/4 inch thick and includes UV protection to guard against sun damage. Plus, insulating your pipes can save you 3% to 4% annually on energy costs because it allows you to lower your water heater temperature slightly.
Sealing Gaps Around Pipes
Even small gaps can let in enough cold air to freeze your pipes. After insulating, take a walk through your home to check for areas where pipes pass through walls, floors, or ceilings. Pay extra attention to spots like windows, doors, basement and crawl space vents, attic access points, and areas around electrical wiring or dryer vents.
For sealing, use caulk to close narrow cracks, spray foam sealant for larger gaps, and weatherstripping around doors and windows. This not only protects your pipes but also helps keep your home warmer, potentially lowering your heating bills during the colder months. Once your pipes are insulated and gaps sealed, the next step is to add heat cables for additional protection to exposed pipes.
Installing Heat Cables on Exposed Pipes
Heat cables, often referred to as heat tape, provide an extra layer of protection for exposed water pipes, complementing insulation efforts. These cables wrap around pipes and generate warmth to prevent freezing, especially in cold conditions. Many heat cables come equipped with an automatic thermostat, typically set between 38°F and 45°F. This feature not only makes them energy-efficient but also reduces the need for constant monitoring.
Heat cables are compatible with common pipe materials like copper, iron, and Schedule 40 plastic water pipes with an outside diameter ranging from 3/8" to 1½". However, when using heat cables on plastic pipes, it’s essential to choose automatic thermostatically controlled heat cables. Non-automatic heat cables can overheat and damage plastic pipes, particularly if they are insulated. Keep in mind that heat cables are not suitable for PVC pipes or hoses.
Best Locations for Heat Cables
Heat cables are most effective in areas where pipes are exposed to extreme cold or located in unheated spaces where insulation alone isn’t sufficient. Key applications include outdoor hose bibs, pool supply lines, sprinkler lines, and water pipes in basements, crawl spaces, attics, garages, or kitchen cabinets along poorly insulated exterior walls. Both hot and cold water pipes exposed to outdoor air can benefit from heat cables, but avoid using them on pipes that exceed 155°F. It's also important to note that heat cables should never be installed inside walls, floors, or ceilings.
Heat Cable Safety Tips
For safety, only use UL-listed heat cables or those approved by reputable testing organizations. Ensure the product is designed for your specific application, whether for indoor or outdoor use. Check the plug’s indicator light - if it flickers, the cable may not be functioning properly. Always plug heat cables directly into a Ground Fault Circuit Interrupter (GFCI) outlet. Avoid using extension cords or power strips, as they can overheat and pose a fire risk.
To install heat cables correctly, avoid doubling back or overlapping the cable, and ensure it is no longer than the pipe it’s protecting. Secure the cable every 6–12 inches using tape or cable ties, and cover it with ½-inch fiberglass or another non-combustible insulation with a vapor seal.
The Foremost Claims Department emphasizes the importance of regular maintenance:
"If you do not check your heat tape regularly, you may eventually find that it has deteriorated to the point that it may actually melt plastic pipe. This kind of thing has led to fire and water damage in the home."
sbb-itb-6ceaf48
Adjusting Your Home During Cold Weather
When the temperature drops, a few simple steps can protect your pipes during cold spells. The best part? You don't need any special tools or skills to get started.
Keeping Your Home Warm Enough
Set your thermostat to at least 55°F to keep your home warm during cold weather. Pipes in unheated areas like basements, attics, and garages are especially at risk when the indoor temperature falls.
To help heat circulate, leave interior doors open so warm air can flow freely between rooms. If you have sinks located along exterior walls, open the cabinet doors underneath to allow warmer air to surround the pipes - but remember to store any cleaning supplies out of reach of children or pets. Also, keep garage doors closed if water supply lines run through the garage. This traps heat and reduces the chances of cold drafts affecting the pipes.
Paul Vacquier, CEO of Beagle Services, emphasizes the importance of preparedness:
"One sudden cold snap is all it takes for a heating system to fail or pipes to freeze, and when that happens, water damage follows fast."
Besides maintaining warmth, keeping water moving through your pipes can further reduce the risk of freezing.
Running Water to Prevent Freezing
During extreme cold, let your faucets drip to keep water flowing. Moving water is less likely to freeze, and this simple step also relieves pressure in the pipes, lowering the risk of bursts.
Focus on faucets connected to exposed pipes in unheated areas like basements, crawl spaces, or along exterior walls. A slow drip is enough to make a difference. According to the American Red Cross, "running water through the pipe - even at a trickle - helps prevent pipes from freezing". While this does use a little extra water, the cost is far less than what you'd face repairing burst pipes.
Preparing Outdoor Plumbing for Winter
Outdoor plumbing is especially vulnerable to freezing temperatures since it's directly exposed to the elements. A single inch of water can cause up to $25,000 in damage, making winter preparation essential.
Here’s how to get your outdoor plumbing ready before the freezing weather arrives.
Draining Outdoor Faucets
Start by disconnecting all hoses, sprayers, and splitters from your outdoor faucets. Leaving these attached is a common reason pipes burst when temperatures drop. Store the hoses in a dry, protected spot to keep them in good condition.
Next, locate the interior shut-off valve for each outdoor faucet. These are typically found in your basement, crawl space, or utility closet. Turn off the water supply using the valve, then head outside and turn the faucet handle to the "on" position. This allows any remaining water to drain out, preventing it from freezing inside the pipe.
Leave the outdoor faucet open throughout the winter. This way, if any water does freeze, the expanding ice won’t cause the pipe to burst. To provide extra protection, install an insulated faucet cover. These covers are affordable, costing between $5 and $10, and offer a simple yet effective safeguard. Casey Finn, a DIY expert, sums it up perfectly:
"Every year, I get people saying, 'I've never done that, and I'm fine.' But honestly? I'm not risking a flooded basement".
Once your faucets are secured, it’s time to move on to your irrigation system.
Winterizing Sprinkler Systems
Begin by shutting off the main water supply to your sprinkler system. This valve is usually located near your water meter or backflow prevention device. Then, drain the system using one of the following methods:
- Manual draining: Open the drain valves to release water.
- Automatic draining: Use built-in valves if your system supports this feature.
- Blow-out method: Use compressed air to force out any remaining water. Landscaping professionals often recommend this method for areas with harsh winters, as it ensures the system is completely dry.
If you opt for the blow-out method, set the air compressor to a pressure between 40 and 80 PSI. Hiring a professional for this service typically costs $60 to $130, but if you prefer a DIY approach, you can rent an air compressor for $30 to $60 per day.
Lastly, insulate any above-ground components with foam covers to protect them from freezing temperatures. Don’t forget to either shut down your sprinkler controller or switch it to "rain mode" to avoid unnecessary cycling during the winter months.
Handling Frozen or Burst Pipes
Even with all the right precautions, extreme cold can still freeze your pipes. Acting quickly can make a big difference in preventing major damage.
How to Spot a Frozen Pipe
A frozen pipe often results in little to no water flow from your faucet. If your neighbors have running water and you don’t, it’s a good sign the issue is on your property. Otherwise, it could be a problem with the main water supply.
Check pipes located along exterior walls, in unheated areas like basements, crawl spaces, attics, garages, or under cabinets in your kitchen or bathroom. Look for visible frost on the pipes or any unusual bulging - both are signs of freezing or potential damage. If you find one frozen pipe, don’t stop there; check other faucets to see if more lines are affected.
Once you’ve identified a frozen section, it’s time to thaw it safely.
Safe Methods for Thawing Pipes
Start by opening the faucet connected to the frozen pipe. This allows water to flow as the ice melts, which helps relieve pressure and reduces the risk of a burst. John Galeotafiore, a Consumer Reports expert, emphasizes caution:
"If you suspect the pipes are frozen, be careful when thawing them out because if the pipe has already burst, the water will come flowing out and flood your home."
Use gentle, consistent heat to thaw the pipe. A hair dryer, an electric heating pad, or hot water-soaked towels work well. If you’re using a portable space heater, keep it at a safe distance from anything flammable.
Avoid using open flames like blowtorches, propane heaters, or charcoal stoves - they can damage the pipe and create a fire hazard. Always start heating at the faucet and work your way toward the frozen section. This allows melted water and steam to escape, reducing pressure inside the pipe. Continue until water pressure is fully restored.
Emergency Steps for Burst Pipes
If a pipe bursts, act fast. Shut off your main water supply immediately. The valve is usually found where the water line enters your home - commonly in the basement or in a concrete box near the street.
Once the water is off, avoid using any electrical appliances in areas with standing water to prevent electrocution. Contact Sasquatch Plumbing Services Seattle for emergency repair services as soon as possible. If you can’t locate the frozen pipe or it’s in a hard-to-reach spot, don’t hesitate to call a professional right away.
Conclusion
Protecting your home from frozen pipes is all about preparation. Insulating exposed pipes, maintaining consistent indoor temperatures, and winterizing outdoor plumbing are key steps to avoid the headache - and expense - of water damage during colder months.
The financial impact of frozen pipes is no small matter. In 2023 alone, State Farm processed over 17,200 claims for frozen pipes, paying out more than $432.5 million. On average, each claim exceeded $23,500.
Taking preventive action now can save you from costly repairs later. If tackling hard-to-reach pipes or winterizing your plumbing feels overwhelming, Sasquatch Plumbing Services Seattle is ready to assist. Their licensed plumbers provide same-day emergency services, upfront pricing, and a satisfaction guarantee - keeping your home safe and your plumbing in top shape all winter long.
FAQs
What’s the best way to keep pipes from freezing during winter?
To keep your pipes from freezing, insulation is your best friend. Cover exposed pipes - especially those in unheated spots like basements, garages, or crawl spaces - with foam pipe insulation or self-sealing pipe wrap. For extra cold conditions, you might want to use fiberglass pipe wrap or heat cables to maintain warmth.
Pay special attention to pipes near exterior walls, under sinks, or in crawl spaces, as these areas are the most at risk. Properly insulating your pipes not only helps you avoid expensive repairs but also keeps your plumbing running smoothly all winter long.
What’s the safest way to thaw a frozen pipe without causing damage?
To thaw a frozen pipe safely, begin by turning on the faucet. This allows water to flow as the ice starts melting. Use heat to warm the frozen section of the pipe - options include an electric heating pad, a hair dryer, or a portable space heater. Make sure any heating device is positioned safely, away from anything flammable. Continue applying heat until the water pressure is fully restored. Avoid using a blowtorch, open flame, or anything that could overheat the pipe and risk a burst. If the pipe remains frozen or you notice potential damage, reach out to a professional plumber right away to prevent further complications.
What should I do right away if a pipe bursts in my home during winter?
If a pipe bursts in your home, your first step should be to turn off the main water valve immediately. This will stop water from continuing to flow and causing more damage. After that, open nearby faucets to release any leftover pressure in the pipes.
If the pipe is frozen but hasn’t burst yet, you can try to thaw it carefully using a hairdryer or space heater. Make sure to keep the heat source at a safe distance to avoid any accidents. Never use an open flame to thaw pipes, as this poses a serious fire risk.
Once you’ve dealt with the immediate problem, reach out to a licensed plumber to assess and repair the damage. Acting fast can limit water damage and help avoid further complications with your plumbing.