When remodeling your home, planning your plumbing upgrades is non-negotiable. Poor preparation can lead to costly repairs, code violations, or even damage to your property. Here’s a quick rundown of what to prioritize:
- Inspect Existing Plumbing: Check pipes for leaks, corrosion, or damage. Test water pressure (ideal range: 40–80 PSI) and ensure drains and vents are clear.
- Plan Layouts and Valves: Map fixture locations and install accessible shut-off valves for easy maintenance.
- Upgrade Pipes: Replace old materials (like galvanized steel) with modern options like PEX or copper.
- Choose Efficient Fixtures: Opt for tankless water heaters, dual-flush toilets, and smart faucets to save water and energy.
- Ensure Code Compliance: Secure permits, follow local regulations, and test your system for leaks and pressure before finishing.
Proper planning not only avoids surprises but also protects your home’s value and ensures a smooth remodel. Let’s break it down step by step.
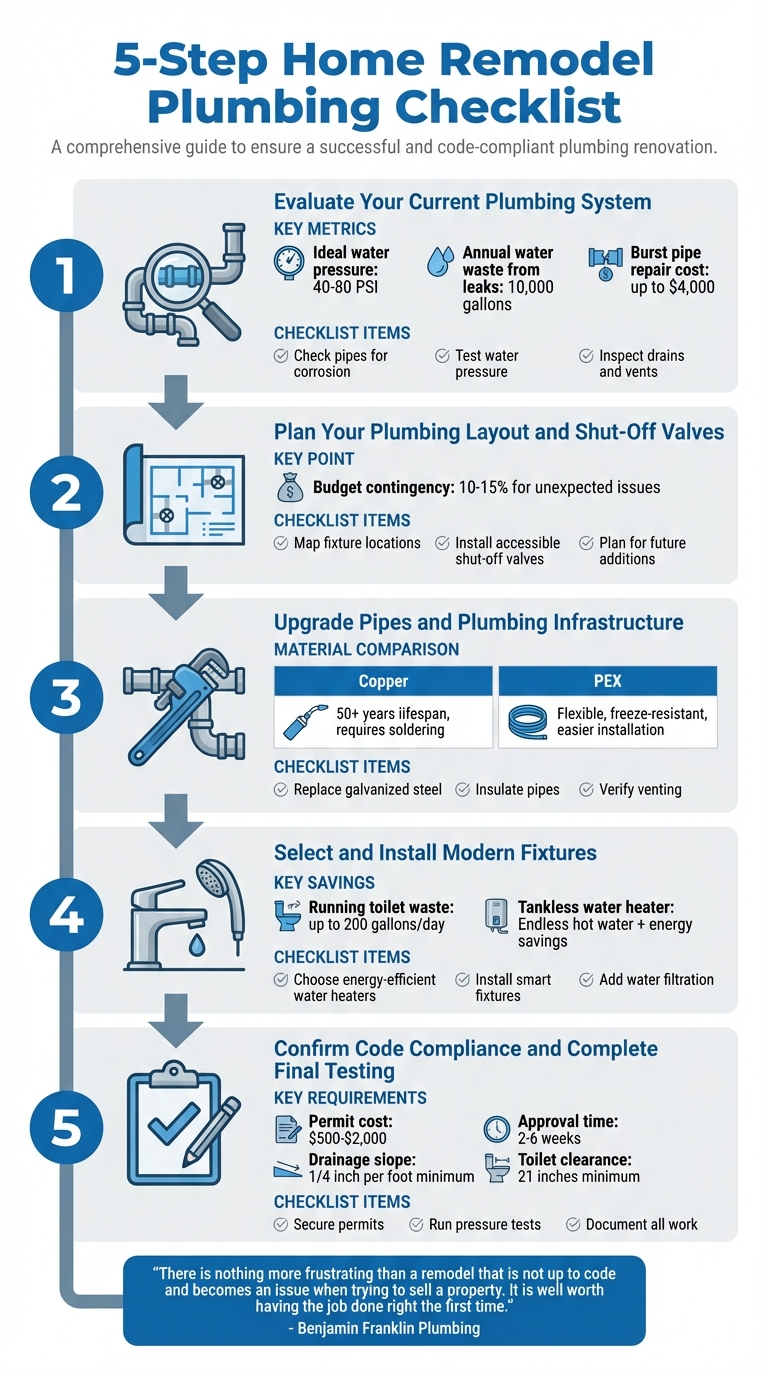
5-Step Home Remodel Plumbing Checklist with Key Metrics
30 Plumbing Items to Inspect before Drywall
Step 1: Evaluate Your Current Plumbing System
Before diving into renovations, take a close look at your plumbing system. This step helps you spot hidden problems and plan your budget effectively. Did you know U.S. households waste about 10,000 gallons of water every year due to leaks? Repairing a burst pipe could set you back as much as $4,000. Start with a full inspection of your plumbing materials to catch any issues early.
Check Pipes and Materials
Inspect exposed pipes in areas like basements, crawl spaces, and under sinks. Different pipe materials have unique warning signs:
- Copper pipes: Look for crystal-like deposits, which can signal pinhole leaks.
- Galvanized steel pipes: These tend to rust internally, leading to brown water and reduced water flow.
- PEX pipes: Watch for cracks, discoloration, or "crazing", often caused by heat or chemical exposure.
Don't forget to examine supply lines connected to appliances. To check for pipe corrosion, fill a clear, white bowl with water - yellow or brown water is a red flag. Also, inspect connection points at valves and fittings, as these are common spots for leaks to develop.
Test Water Pressure and Flow Rates
Use a water pressure gauge on an outdoor spigot after turning off all indoor water. An ideal pressure reading falls between 40 and 80 PSI. If it's below 40 PSI, you might have leaks or undersized pipes; over 80 PSI can strain fixtures and pipes. To check for hidden leaks, turn off all appliances and see if the water meter's indicator moves.
"Low pressure may indicate a hidden leak, while high pressure can stress pipes and cause premature fixture wear." - Mr. Rooter Plumbing
Once you've tested water pressure, turn your attention to drains and vent systems for a complete plumbing evaluation.
Inspect Drains and Vent Systems
Run water through multiple fixtures and listen carefully. Strange sounds like gurgling often mean there's a blockage or an issue with venting. If you notice sewer gas odors, it could point to cracked vents or dried-out P-traps.
"If using one fixture causes another to gurgle, it's a classic sign of a blockage in your main sewer line creating negative pressure." - Cactus Plumbing and Air
For older homes or properties surrounded by large trees, consider scheduling a camera inspection. Tree roots can invade sewer lines, and it's better to catch this problem before starting your remodel.
Step 2: Plan Your Plumbing Layout and Shut-Off Valves
Once you've assessed your current plumbing system, it’s time to map out your new fixture locations and ensure easy access to shut-off valves. Start by charting all existing water supply lines and drains before making any changes - this avoids interference with essential plumbing routes. Grouping fixtures near existing utility spaces, like bathrooms or kitchens, can simplify installation and help keep costs under control. From there, finalize fixture placement and shut-off valve arrangements to streamline the remodeling process.
"Replacing plumbing during a renovation is far more efficient than tearing into a new tile floor later." - Clean Line Plumbing
Moving or Adding Plumbing Fixtures
If you’re planning to move or add fixtures, such as a walk-in shower or soaking tub, prioritize these early in the process. This ensures you can properly route plumbing and allocate your budget effectively. Make sure waste lines have the correct slope and are close enough to vents to prevent slow drainage or sewer gas problems. When relocating major fixtures like toilets or showers, it’s wise to consult a professional to ensure the new setup complies with local building codes, particularly for trap arm lengths and venting requirements.
Think ahead when planning your remodel. If you foresee adding features like a laundry room or an extra bathroom in the future, consider installing the necessary piping now. This foresight can save you significant costs later on. Additionally, check whether your current plumbing can handle high-demand fixtures like double vanities or large soaking tubs. If not, plan for rerouting or upgrading those lines. To avoid surprises, set aside 10-15% of your budget for unexpected issues.
Installing Accessible Shut-Off Valves
Every fixture - whether it’s a sink, toilet, or appliance - should have its own shut-off valve. This allows you to address maintenance or emergencies without cutting off water to the entire house. Main shut-off valves are typically found in basements, crawlspaces, or utility closets, but they can become stuck over time due to mineral buildup. Before starting demolition, test all valves and replace any that are outdated or difficult to access.
"If a pipe ever bursts, this valve is your home's first line of defense to stop the flow of water and prevent catastrophic damage." - Cactus Plumbing and Air
To make future repairs easier, install access panels for shut-off valves. This way, you won’t need to tear into walls down the line. Be sure to test all valves, replace any that are no longer functional, and document their locations with photos. This ensures everyone in your household knows where the main shut-off valve is and how to use it in an emergency.
Step 3: Upgrade Pipes and Plumbing Infrastructure
Once your layout and shut-off valves are finalized, it's time to tackle outdated pipes. Many older homes still rely on galvanized steel pipes, which are prone to rust and corrosion. If you're remodeling, this is the perfect opportunity to replace them with materials that meet modern standards. The type of piping material you choose will influence installation costs, longevity, and how well your system handles freezing temperatures. This step lays the groundwork for selecting the best repiping option for your home.
Repiping Options: PEX vs. Copper
When it comes to repiping, the two most popular materials are copper and PEX (cross-linked polyethylene). Copper has long been a go-to choice, known for its durability and ability to last over 50 years. However, copper pipes require soldered joints and are more susceptible to bursting in freezing conditions.
PEX, on the other hand, offers greater flexibility and is easier to install. It can be threaded through walls with fewer fittings, making it a convenient option for remodels. Plus, PEX expands when frozen, reducing the risk of bursts. Before making a decision, test your water quality - certain types of water can cause pinhole leaks in copper or degrade PEX over time. For vacation homes or properties in areas with harsh winters, PEX is often the better choice.
Insulate Pipes for Energy Efficiency
To improve energy efficiency and prevent issues, insulate both hot and cold water pipes in unheated spaces like basements, crawl spaces, and utility rooms. Insulation reduces heat loss and prevents condensation (commonly called "sweating"). Additionally, make sure to disconnect garden hoses before the first freeze to avoid water backup and burst pipes. During your annual maintenance routine, check all exposed pipes for missing or damaged insulation.
Verify Proper Venting and Drain Sizes
Proper venting and drain sizing are critical for a well-functioning plumbing system. Make sure vent pipes are correctly positioned and that all drain lines have the proper slope to ensure smooth, gravity-fed drainage. Test each fixture with hot water to confirm it drains efficiently. If you hear gurgling sounds, it could indicate negative pressure caused by venting problems. Also, inspect roof plumbing vents for obstructions like bird nests or debris that could disrupt drainage.
"Gurgling sounds in a home's plumbing could point to a blocked vent stack on the roof, a subtle issue that can compromise every drain in the house." - Alvarez Plumbing
sbb-itb-6ceaf48
Step 4: Select and Install Modern Fixtures
Now that your plumbing upgrades from Steps 1–3 are complete, it's time to focus on fixtures that bring efficiency, convenience, and style to your remodeled space. Choosing the right fixtures not only helps lower utility bills but also enhances daily comfort and increases your home's value. This step is also a great opportunity to address water quality concerns and incorporate smart technology into your setup. Let’s take a closer look at some key options to consider.
Energy-Efficient Water Heaters
When selecting a water heater, think about your household's hot water needs. Traditional tank models, which typically last 8–12 years, store a fixed amount of hot water. On the other hand, tankless water heaters heat water on demand, saving both space and energy. These are particularly useful in remodels where every square foot matters. While tankless systems have a higher upfront cost, they provide endless hot water and help reduce energy bills over time.
"Tankless water heaters or energy-efficient models can offer long-term benefits in terms of energy savings and continuous hot water supply." - Olson Superior Plumbing
Don't overlook safety and maintenance. Make sure the T&P relief valve is working by lifting the lever annually - this should produce a noticeable water flow. If you hear popping or rumbling noises when the heater runs, sediment buildup might be the issue, and the tank will need flushing. In areas prone to earthquakes, check that the heater is secured with earthquake straps according to local codes. For gas models, proper venting is essential to avoid carbon monoxide risks.
Smart Plumbing Fixtures
Upgrading to smart plumbing fixtures can further reduce water waste and improve your home's functionality. Touchless faucets are a great choice - they minimize accidental water use and keep handles cleaner, making them both practical and hygienic. Dual-flush toilets allow you to select a partial flush for liquids and a full flush for solids, saving thousands of gallons of water per year. Considering that a single running toilet can waste up to 200 gallons daily, replacing it with a low-flow or dual-flush model can make a noticeable impact. For showers, smart showerheads offer precise temperature control, monitor water usage, and use high-efficiency spray patterns that maintain strong pressure while conserving water.
Add Water Filtration Systems
A remodel is the perfect time to improve water quality by installing a filtration system. You can choose between point-of-use filters, like under-sink units for drinking water, or whole-home systems that treat water as it enters your home. Whole-home systems protect every faucet, shower, and appliance from sediment and contaminants. If your hot water looks brown or rusty, it could indicate that your water heater's internal lining is corroding. Pairing a new water heater with a filtration system can help prevent this issue and extend the life of your fixtures.
Step 5: Confirm Code Compliance and Complete Final Testing
Once new fixtures are installed, it's crucial to ensure they meet code requirements and function properly. Skipping this step can lead to failed inspections, expensive repairs, or even safety risks.
Understand Permit Requirements
When remodeling plumbing systems, permits are often required for tasks like moving fixtures, altering layouts, or making structural changes. These permits typically cost between $500 and $2,000 for a standard bathroom remodel. In larger cities, the approval process may take anywhere from two to six weeks.
"Plumbing codes are more than just guidelines; they're essential rules designed to ensure the safety, functionality, and longevity of plumbing systems." - 41 Lumber
Check with your local building department to understand specific permit requirements. While many areas follow the IPC or UPC standards, some municipalities enforce stricter rules. For instance, in early 2025, a kitchen remodel in Fontana, California, required replacing outdated galvanized steel pipes with PEX to meet updated California plumbing codes. The project also involved adding low-flow fixtures and a smart shutoff valve before passing inspection.
Key plumbing codes to keep in mind include:
- A minimum drainage slope of 1/4 inch per foot
- Proper venting to prevent sewer gas from entering the home
- Fixture clearance requirements, such as 21 inches in front of toilets
If you're using PVC pipes, remember to apply purple primer to all joints as visible proof of proper preparation. Also, never seal valves or cleanouts behind permanent walls - install access panels for easy maintenance instead.
After securing permits and understanding the requirements, move on to testing your system for pressure and leaks.
Run Pressure and Leak Tests
Before closing up walls with drywall, test the plumbing system to ensure there are no leaks and that the water pressure is within the correct range. Start by closing all outlets and pressurizing the system. Use a pressure gauge to monitor; if the pressure drops, there's a leak that needs immediate attention. The ideal water pressure for most homes is between 40 and 80 PSI.
Check all faucets, joints, and fixtures for leaks. Fill sinks and tubs to test how quickly they drain, and listen for any gurgling sounds, which could indicate blockages or venting problems.
Once you're confident the system is secure, take steps to document your work.
Document Your Plumbing Work
Photograph the plumbing lines before closing up the walls. This creates a visual map of where pipes, joints, and connections are located, which can be incredibly helpful for future repairs or renovations.
Keep a folder - either physical or digital - that includes these photos, approved plans, permits, and the locations of shut-off valves. Clearly label the main water shut-off valve and individual fixture valves so they can be quickly accessed in an emergency. This documentation not only simplifies maintenance but also adds value to your home by giving potential buyers confidence in the quality of the plumbing system.
Conclusion: Plan Your Plumbing Remodel the Right Way
A well-thought-out plumbing checklist - covering everything from evaluating your current system to installing fixtures - can save you from unexpected costs and avoidable headaches during your remodel. Starting with a solid plan ensures your plumbing not only functions smoothly but also adds value to your home.
"There is nothing more frustrating than a remodel that is not up to code and becomes an issue when trying to sell a property. It is well worth having the job done right the first time." - Benjamin Franklin Plumbing
This quote highlights the importance of hiring certified professionals for your remodel. Licensed experts ensure your project meets building codes, passes inspections, and avoids complications down the line.
Your checklist becomes the roadmap for a successful remodel. For instance, Sasquatch Plumbing Services Seattle offers comprehensive solutions, handling everything from pipe relocation and modern fixture installations to securing permits and completing inspections. Plus, their upfront pricing and guarantees mean no surprises when the project wraps up.
FAQs
What are the advantages of choosing PEX pipes instead of copper during a remodel?
Upgrading to PEX pipes comes with a range of benefits that make them a practical option for home renovations. Their flexibility makes installation much easier, especially in hard-to-reach areas. Plus, unlike copper, PEX pipes are resistant to freezing and corrosion, helping to avoid long-term damage and increasing the durability of your plumbing system.
Another advantage is cost. PEX pipes are more affordable than copper, both in terms of the materials themselves and the labor required for installation. With fewer joints, they also minimize the chances of leaks over time. If you're planning to update your plumbing and want a solution that saves both time and money, PEX pipes are worth considering.
What steps should I take to ensure my plumbing remodel meets local building codes?
To make sure your plumbing remodel meets local building codes, the first step is reaching out to your local building department. They’ll provide details on specific requirements and guide you through obtaining the necessary permits. Always submit your plans for approval before starting any work to sidestep potential problems.
As the remodel progresses, stick to the National Uniform Plumbing Code while also accounting for any local modifications. Key areas to focus on include proper venting, choosing the right pipe sizes, placing cleanouts in the correct locations, and using approved materials. Don’t forget to schedule inspections at the required stages to confirm everything is up to code.
It’s a smart move to hire a licensed plumber who knows the local regulations inside and out. They can help you navigate the rules, ensure your work passes inspections, and save you from expensive errors later on.
What should I look for when choosing energy-efficient plumbing fixtures during a remodel?
When choosing plumbing fixtures that conserve energy, focus on water-saving options like low-flow toilets, faucets, and showerheads. Check for products with the EPA WaterSense label or ENERGY STAR certification - these labels indicate that the fixtures use less water and energy while still delivering great performance. Upgrading to modern solutions, such as tankless water heaters, can also reduce utility costs without compromising your household's needs.
Take into account your home's specific needs, such as the number of bathrooms or how often the kitchen is used, to find fixtures that strike the right balance between efficiency and practicality. These upgrades not only help cut expenses over time but also contribute to environmentally friendly living.