When a plumbing emergency strikes, quick action can save you thousands in repair costs and prevent extensive damage to your home. Here’s what you need to know:
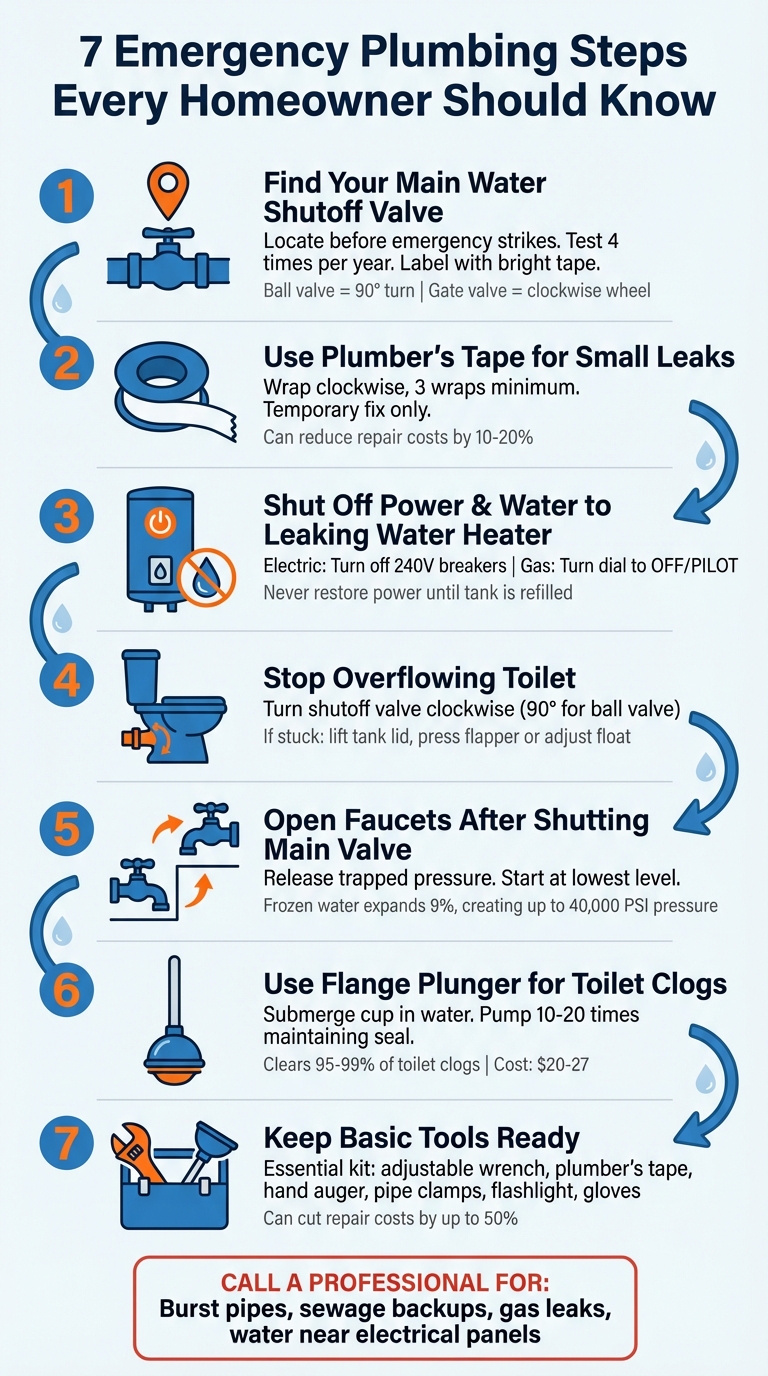
- Locate your main water shutoff valve in advance to stop water flow immediately during a crisis. Regularly test it to ensure it works.
- Use plumber's tape for temporary fixes on small leaks, but always follow up with professional repairs.
- Turn off power and water to a leaking water heater to avoid hazards like electrical shocks.
- Stop an overflowing toilet by using the shutoff valve or adjusting internal tank components.
- Open all faucets after shutting off the main water valve to release trapped pressure and prevent further pipe damage.
- Invest in basic plumbing tools like a flange plunger, adjustable wrench, and pipe repair clamps to manage emergencies until help arrives.
Knowing these steps and having the right tools can make a big difference. But for major issues like burst pipes, sewage backups, or gas leaks, call a licensed plumber immediately.
7 Emergency Plumbing Steps Every Homeowner Should Know
Controlling Plumbing Emergencies | Ask This Old House

1. Find Your Main Water Shutoff Valve Before You Need It
One of the smartest things you can do to protect your home is to locate your main water shutoff valve before an emergency strikes. When water starts flooding your home, every second matters. Scrambling to find the valve in that moment can lead to even more damage. As home repair expert Timothy Dale points out:
A main water shutoff valve usually uses a lever operating a ball valve to easily shut down the incoming water for the entire house. Knowing its location, appearance, and operation is critical.
To find your shutoff valve, start by checking the usual spots.
Look in areas like the basement, mechanical or laundry room, garage, or near outdoor faucets and water meters. If your home uses a well water system, the valve is often located near the pressure tank.
Once you’ve found it, test the valve to ensure it works properly. Turn it on and off to confirm it operates smoothly. Tim Carter, founder of Ask the Builder, offers this advice:
This is a ball valve. It's the best one to have for a main shutoff valve in your home. Be sure to turn it on and off four times a year.
Unused valves can seize up over time due to mineral buildup, making them useless when you need them most. Regularly testing the valve helps prevent this.
To make it easy for everyone in your household to find the valve during an emergency, label it with bright tape or a tag. If the valve is hard to reach, consider having a plumber install a secondary shutoff.
Most valves fall into two types: ball valves, which are lever-operated and require a simple 90° turn, and gate valves, which are wheel-operated and turn clockwise. Ball valves are generally more reliable, while older gate valves can become brittle and prone to failure.
2. Use Plumber's Tape to Stop Small Leaks Temporarily
Plumber's tape, also known as Teflon tape, is a thin, white tape made from PTFE. It's designed to seal threaded pipe connections by filling in gaps and lubricating the threads for a snug fit.
To apply it, wrap the tape clockwise around the male threads, starting at the second thread. Typically, three wraps are enough, but you can add more if the joint feels loose. Before applying, make sure to clean and dry the threads using a wire brush or cloth. Avoid overwrapping, as this can cause cracking or prevent the threads from seating properly.
"Careful plumbers use both pipe joint compound and teflon on every joint for extra security. They don't want to come back."
– Family Handyman
While plumber's tape is handy, it's only a temporary solution for leaks. For pinhole leaks or small cracks, you can combine it with a rubber patch secured by hose clamps, then wrap the plumber's tape over the patch for added reinforcement. Acting quickly can reduce future repair costs by 10%–20%. However, always follow up with a professional repair to ensure the problem is fixed properly. Up next, discover how to protect major systems during emergencies.
3. Shut Off Power and Water to a Leaking Water Heater
A leaking water heater isn’t just an inconvenience - it’s a potential hazard. It can lead to electrical shocks or flooding, so your first move should be to cut off both the water supply and the power source.
For electric water heaters, locate your main electrical panel and switch off both 240V breakers. If you have a gas water heater, turn the dial to "OFF" or "PILOT" and rotate the gas valve 90° until it’s perpendicular to the pipe.
Next, shut off the water supply. Use the cold water inlet valve on the heater, or if necessary, turn off the main water supply to your home. To relieve pressure in the system, open a hot water faucet.
"Every few months, I give each shutoff valve a gentle turn just to make sure it's not stuck. Valves that sit for years without being touched can seize up or corrode, and when you actually need to use them, they won't budge."
– Randal Fuller, Contractor, Fuller Services
If water is near the electrical panel, stay away from it. Flooding around electrical systems is extremely dangerous. Evacuate the area and contact your utility provider immediately. Also, don’t restore power until the water heater tank is refilled - running the heating elements dry can cause permanent damage.
Now that you’ve handled the immediate risks, move on to the next step to ensure further safety.
4. Stop an Overflowing Toilet Using the Shutoff Valve
An overflowing toilet can turn into a messy situation fast, spilling water all over your bathroom floor. Your quickest solution? The toilet shutoff valve. You’ll usually find it on the water supply line behind the toilet. It’s a small handle - often oval-shaped or a straight lever.
To cut off the water flow, turn the valve clockwise until the water stops. If your toilet has a modern ball valve with a straight handle, a simple 90-degree turn should do the trick. But if the valve doesn’t budge or fails to work, it’s time to take action inside the toilet tank.
If the shutoff valve is stuck or out of reach, don’t force it - you could make things worse. Instead, lift the tank lid and address the problem from within. You can press down on the flapper to seal the opening or adjust the float mechanism to stop the water from filling the tank.
"Short of shutting off the main valve to your home, the toilet valve is the only way to entirely stop the flow of water!" – Benjamin Franklin Plumbing
To avoid surprises during an emergency, make a habit of testing and lubricating your shutoff valve regularly. Keep it in good working order, and label it clearly so everyone in your household knows where it is and how to use it. A little preparation can save you from a big headache later.
sbb-itb-6ceaf48
5. Open Faucets to Reduce Pressure from Burst Pipes
Once you've turned off your main water valve, the next step is to open all faucets and flush the toilets. Doing this helps drain any trapped water and releases built-up pressure in the pipes, which is critical to preventing further damage. Start with the cold water faucets, then move on to the hot water ones, and make sure to flush every toilet to clear water from tanks and upper pipes.
When water freezes, it expands by about 9%, and this can send pressure skyrocketing from 40 psi to an astonishing 40,000 psi. Opening the faucets allows this pressure to escape, reducing the risk of additional pipe bursts. As Royalty Plumbing puts it:
"By turning them on, you're letting the remaining water out and eliminating any pressure that's still inside." – Royalty Plumbing
If your home has multiple floors, begin at the lowest level - like a basement utility sink - so gravity can assist in draining the water more effectively. Keep the faucets open until the water fully stops dripping to ensure all residual pressure is released.
In addition to relieving pressure in the pipes, it's important to check for water pooling in ceilings, which can lead to structural problems. If you notice a bulge forming on a ceiling, carefully puncture the center with a screwdriver to allow the water to drain in a controlled manner. Use a bucket to catch the water as it drains. This step is crucial because water weighs over 8.5 pounds per gallon, and the added weight can cause a ceiling to collapse if not addressed.
6. Use a Flange Plunger for Toilet Clogs
Once you've managed the water flow, the next step is tackling the clog itself. For this, a flange plunger is your best bet. Unlike a standard cup plunger, which has a flat bottom and struggles to seal against the curved shape of a toilet drain, a flange plunger features an extra rubber flap. This flap ensures a tight, airtight seal, which is crucial for creating effective suction.
Before plunging, make sure to submerge the plunger so the cup fills with water. This step is important because water, being incompressible, transfers force directly to the clog. Air, on the other hand, absorbs energy and reduces the effectiveness of your efforts. Mark McShane, Managing Director at Skills Training Group, emphasizes the importance of technique:
"A well-performed plunge creates suction through the tight seal between plunger and drain".
Begin with a gentle push to release any trapped air, listening for the sound of water as the seal improves. Once the seal is secure, pump the plunger up and down 10–20 times, making sure the seal remains intact. Both the upward and downward motions are critical for loosening the clog. If the clog is particularly stubborn, you can temporarily block nearby sink or tub overflow drains with duct tape. This prevents air from escaping and increases suction power.
Having the right tools on hand can make all the difference in an emergency. A good flange plunger can clear 95% to 99% of toilet clogs. These plungers typically cost between $20 and $27, a small price to pay compared to the cost of a plumber. To maintain hygiene, it's a good idea to keep a plunger specifically designated for toilet use.
7. Keep Basic Plumbing Tools on Hand
Once you've dealt with any immediate plumbing issues, it's a smart move to have a basic plumbing toolkit ready for emergencies. These tools can help you manage the situation and prevent further damage until a professional can step in.
Having the right tools on hand during a plumbing emergency can make a huge difference. Quick access to essentials like an adjustable wrench, plumber's tape (Teflon tape), a hand auger (drain snake), pipe repair clamps, rubber patches with hose clamps, a flashlight, rubber gloves, and eye protection allows you to stabilize the problem and avoid more extensive damage.
Plumbing emergencies can be expensive - sometimes costing over $3,000. However, having these tools at the ready can cut repair costs by up to 50%. For example, a small half-inch pipe can release 50 gallons of water per minute, while a larger four-inch pipe can unleash up to 3,400 gallons per minute. Acting quickly to stop the water flow can save you from a major disaster.
To stay organized, store these tools in a dedicated "first response" kit in an easy-to-reach spot like your utility room or basement. Don't forget cleanup supplies, either. A 5-gallon bucket, heavy-duty towels, and a wet-dry shop vacuum are essential for removing standing water. This is especially important because moisture can lead to mold growth in just 24 to 48 hours.
You don’t need to invest in high-end, professional-grade tools - just the basics will do. As Flotechs Plumbing and Heating puts it:
"When you're prepared with the right tools and basic know-how, you can prevent a little chaos from turning into a full-blown disaster."
Temporary Fixes vs. Professional Repairs
When it comes to plumbing issues, understanding the difference between temporary fixes and professional repairs can save you time, money, and stress.
Temporary fixes - like plumber's tape, epoxy putty, or rubber clamps - are handy for small-scale issues like pinhole leaks or minor cracks. These solutions work well in low-pressure situations and can hold things together until a professional repair is possible. However, they’re not designed to handle the typical household water pressure of around 60 PSI. So while they might stop a drip, they’re not a permanent solution.
On the other hand, professional repairs involve replacing the damaged section with materials like copper, PEX, or PVC piping. This process often includes soldering and using proper fittings to ensure the plumbing is restored to full functionality and meets local building codes. Unlike temporary patches, professional fixes are built to last, providing a durable solution that can handle the full pressure of your water system.
If a temporary fix starts to fail, it’s a clear sign that it’s time to call in the pros.
| Feature | Temporary Fix | Permanent Repair |
|---|---|---|
| Common Materials | Plumber's tape, epoxy putty, rubber clamps | Copper, PEX, or PVC piping; solder; industrial sealants |
| Best For | Pinhole leaks, small cracks, dripping joints | Burst pipes, major issues, hidden leaks in walls/slabs |
| Durability | Short-term | Long-term |
| Pressure Limit | Low pressure only | Full system pressure |
Temporary fixes are a stopgap, but professional repairs are an investment in your home’s safety and functionality. While professional services can range from $100 to $500 for standard repairs, emergency calls after hours often come with higher costs. However, addressing the issue properly prevents recurrent leaks, water damage, and mold growth. Knowing when to opt for professional help ensures your plumbing system stays in top shape - until Sasquatch Plumbing Services Seattle steps in to provide a lasting solution.
Conclusion
Being prepared can make all the difference when dealing with plumbing emergencies. These situations don’t wait for a convenient time, and acting quickly can significantly minimize damage. For instance, knowing the location of your main water shut-off valve, having basic tools on hand, and understanding how to safely turn off water and power can slash repair costs by as much as 50%.
However, it’s equally important to recognize when it’s time to call in the pros. Issues like sewage backups, leaks inside walls, water near electrical panels, or the smell of gas are clear signs that professional help is needed immediately.
"Knowing what to do - and doing it quickly - can save your home and your wallet." - Roseville Plumbing Services
The first few minutes of a plumbing emergency are critical. Acting fast can protect your home, limit damage, and keep your family safe. But when the problem goes beyond a quick fix, professional assistance is key. Sasquatch Plumbing Services Seattle offers same-day emergency service, with licensed plumbers ready to handle the job using the right tools and expertise for long-lasting solutions.
FAQs
How can I find and test my home's main water shut-off valve?
To find your main water shut-off valve, start by looking near your property line for a metal box labeled "CWM" (City Water Meter). Use a flat-head screwdriver or a meter key to open the cover. Inside, you’ll see the shut-off valve connected to the pipe that leads into your home.
If the valve has a lever handle (a ball valve), turn it 90° so it’s perpendicular to the pipe to shut off the water. If it’s a round wheel (a gate valve), turn the knob clockwise until it stops. To confirm it’s off, open a faucet at the lowest point in your home - if no water comes out, the valve is doing its job. Don’t forget to securely close the meter box once you’re done.
If the valve is stuck or hard to turn, don’t force it - this could cause damage. Instead, reach out to Sasquatch Plumbing Services Seattle for help. It’s also smart to label the valve clearly so you can find it quickly in an emergency.
What are some quick fixes for small plumbing leaks in an emergency?
If you're in a pinch, duct tape can be a lifesaver. Wrap it tightly around the leak to reduce water flow. Another option is to use a piece of rubber, like a cut section from an old inner tube, and secure it firmly over the leak with a hose clamp. Got a C-clamp handy? Press a rubber patch onto the leak, place a flat piece of wood over it, and tighten the clamp to keep everything in place. These temporary fixes can help limit water damage until a plumber can take care of the problem properly.
When is it time to call a plumber during a plumbing emergency?
If you’re facing serious plumbing problems, don’t hesitate to reach out to a professional plumber. Issues like water gushing from a burst pipe, sewage backing up into your home, or a total loss of water supply require immediate attention. Other emergencies to watch for include a strong gas smell near your water heater, an overflowing toilet that won’t stop running, or a major leak causing flooding in your home.
When a plumbing issue threatens your home’s safety or leads to significant damage, acting quickly is crucial. Calling a plumber right away can help prevent the situation from escalating further.