A running toilet wastes water and increases your water bill - up to 200 gallons a day or more than 6,000 gallons a month. The good news? Most issues are easy and inexpensive to fix yourself. Here’s how:
- Common Causes: Worn flapper, incorrect float height, damaged fill valve, jammed handle, or a misplaced refill tube.
- DIY Fixes: Replace the flapper ($5–$10), adjust the float, or swap the fill valve ($15–$30). Basic tools like a wrench and screwdriver are usually enough.
- Savings: Fixing the problem can save $20–$30 a month on water bills, paying off repair costs in less than two months.
If DIY efforts don’t work, or if you notice cracks or severe leaks, call a professional plumber. Acting quickly saves water, money, and frustration.
Fix a Running Toilet: Replace Fill Valve & Flapper
Common Causes of a Running Toilet
A running toilet can be frustrating, but pinpointing the cause is often straightforward. Most issues stem from a handful of usual suspects. Let’s break them down so you can troubleshoot with confidence.
Worn or Damaged Flapper Seal
The flapper is the rubber seal that holds water in the tank until you flush. Over time, it can wear out, crack, or lose its shape, allowing water to leak from the tank into the bowl continuously.
Here’s a simple test: Add a few drops of food coloring to the tank and wait for 10–15 minutes without flushing. If you see colored water in the bowl, the flapper isn’t sealing properly. Another telltale sign is the sound of “phantom flushes,” where the toilet refills itself periodically.
Incorrect Float Height
The float controls when the fill valve shuts off, determining the water level in the tank. If it’s set too high, water will spill into the overflow tube - the tall pipe in the center of the tank - and keep running. Ideally, the water level should sit about an inch below the top of the overflow tube.
If you notice water flowing into the overflow tube after the tank fills or hear a constant trickling sound, the float may need adjustment. Look for a water level that seems unusually high as another clue.
Damaged Fill Valve
The fill valve is responsible for refilling the tank after each flush. When it’s damaged, it may fail to turn off, causing the tank to keep filling. You might notice a faint hissing or trickling sound, even when the toilet hasn’t been used recently.
To check if the fill valve is the issue, try lifting the float arm manually. If water keeps flowing into the tank, the fill valve likely needs replacement.
Jammed Toilet Handle
A sticky or jammed handle can prevent the flush mechanism from resetting, leaving the flapper open. This is often caused by corrosion, mineral buildup, or a loose mounting nut.
Signs of trouble include a handle that feels stiff, squeaks, stays down after flushing, or feels loose and wobbly. Any of these could disrupt normal operation.
Improperly Positioned Refill Tube
The refill tube is a small, flexible tube that directs water back into the bowl after a flush. If it’s positioned incorrectly - such as hanging too far into the overflow tube instead of being clipped to its edge - it can create a siphoning effect, causing water to flow continuously.
To check, lift the tank lid and inspect the refill tube. It should be securely clipped to the edge of the overflow tube, not dangling inside.
How to Fix a Running Toilet
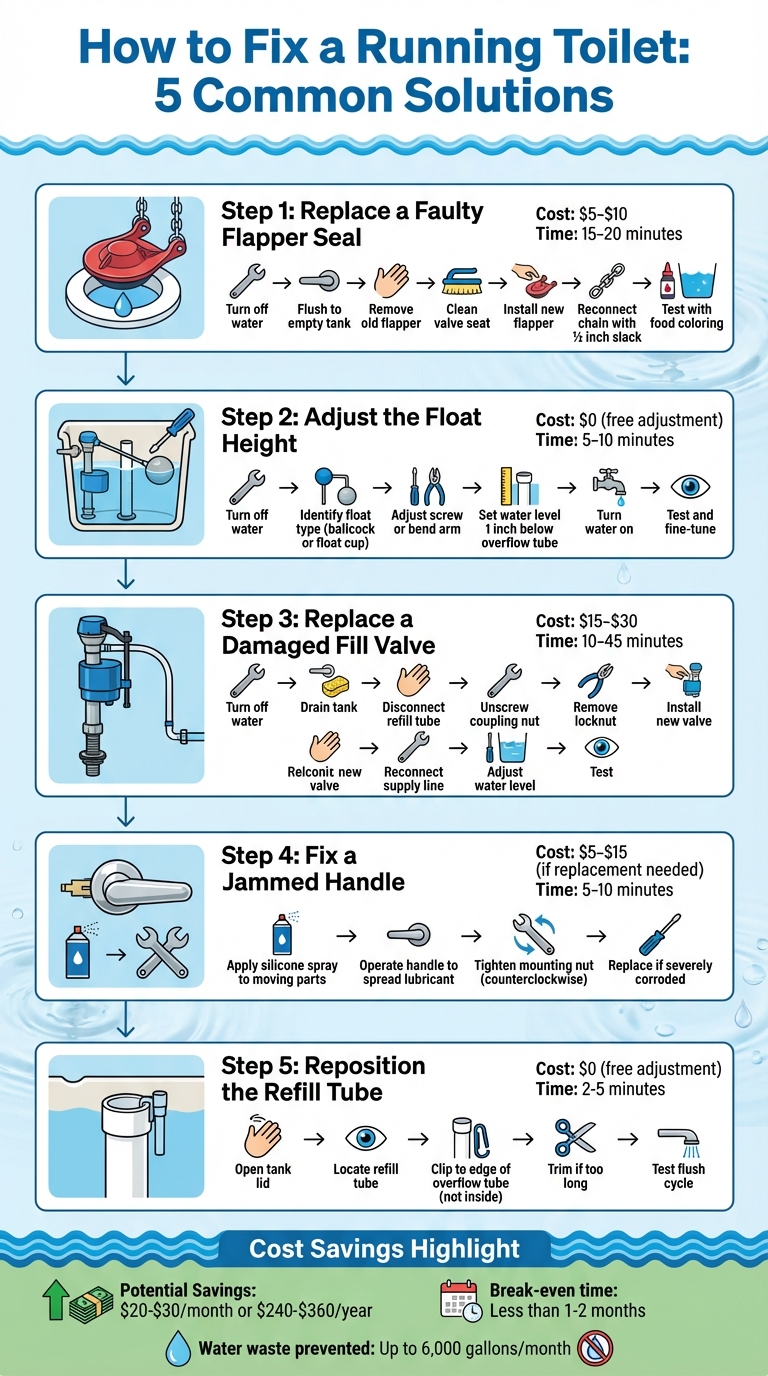
5-Step Guide to Diagnosing and Fixing a Running Toilet
Once you've pinpointed the issue, it's time to roll up your sleeves and get to work. Most running toilet problems can be fixed with basic tools and a bit of patience. Here's how to handle the most common culprits step by step.
Replacing a Faulty Flapper Seal
The flapper is often the main suspect when a toilet keeps running, and swapping it out is pretty simple. Start by turning off the water supply and flushing the toilet to empty the tank. Hold the handle down to drain as much water as possible.
Next, remove the old flapper. Disconnect the chain from the flush handle lever, then unclip the flapper's side ears from the pegs on the flush valve. If your flapper uses a ring adapter, slide it off the overflow pipe. Before installing the new flapper, clean the valve seat thoroughly to remove any mineral buildup or debris that could prevent a tight seal.
When buying a replacement, take the old flapper to the store or note your toilet's brand and model. Universal flappers are compatible with most toilets and typically cost between $5 and $10. If you're shopping online, measure the drain diameter - a 2½-inch drain requires a 2-inch flapper.
To install the new flapper, attach the ears to the side pegs or slide the ring adapter over the overflow tube, depending on your setup. Connect the chain with about ½ inch of slack to ensure it functions properly.
Turn the water back on and test by flushing a few times. For added assurance, drop a few drops of food coloring into the tank and wait 15–30 minutes. If the color seeps into the bowl, the flapper may need further adjustment.
"Replacing the flapper is the most effective way to resolve these issues and prevent water waste." - Aaron Stickley, Licensed Plumber
Adjusting the Float Height
If your toilet keeps trickling after the tank fills, the float height might need adjustment. The float determines when the tank stops filling, and tweaking it is a straightforward task. Begin by turning off the water and removing the tank lid.
Identify the type of float in your toilet. Older models use a ballcock float - a round ball on a metal or plastic arm - while newer toilets typically have a float cup that moves along the fill valve shaft. For a ballcock float, locate the adjustment screw where the arm connects to the fill valve or gently bend the arm downward to lower the water level. For a float cup, look for an adjustment screw or clip on the side of the float to slide it up or down.
Aim to set the water level about 1 inch below the top of the overflow tube. Turn the water back on, let the tank fill, and check the level. Make small adjustments as needed to achieve a proper water level that ensures a strong flush without overflowing.
Replacing a Damaged Fill Valve
If the fill valve is causing the problem, replacing it is often the best solution. Universal adjustable-height fill valves are widely available and fit most modern toilets. This repair usually takes between 10 and 45 minutes.
Start by turning off the water and draining the tank. Use a sponge to remove any remaining water. Disconnect the small rubber refill tube from the overflow tube.
To remove the old fill valve, place a rag under the connection point and use an adjustable wrench to unscrew the coupling nut that connects the water supply line to the valve base. From underneath the tank, use pliers to loosen and remove the plastic locknut securing the valve, then lift the old valve out.
Install the new fill valve by adjusting its height according to the manufacturer's instructions and inserting it into the tank opening. Secure it from underneath with the new locknut - hand-tighten it first, then give it a quarter turn with pliers. Reconnect the water supply line and reattach the refill tube to the overflow tube.
Turn the water back on gradually and let the tank fill. Adjust the water level setting on the fill valve to about 1 inch below the overflow tube. Test with several flushes to confirm everything is working smoothly.
Fixing a Jammed Handle
A stiff or loose handle is usually an easy fix. If the handle feels stuck or squeaky, apply a small amount of silicone spray or petroleum jelly to the moving parts inside the tank. Operate the handle several times to spread the lubricant evenly.
If the handle is wobbly, tighten the mounting nut inside the tank. Remember, this nut has reverse threads, so you'll need to turn it counterclockwise to tighten. If the handle remains stuck or the corrosion is severe, it might be time to replace it. Replacement handles are inexpensive and readily available at hardware stores.
Repositioning the Refill Tube
Sometimes the issue is as simple as a refill tube that's out of place. Open the tank lid and locate the small, flexible refill tube. It should be clipped to the edge of the overflow tube, not dangling inside it.
If the tube is incorrectly positioned, detach it and clip it securely to the rim of the overflow tube. If the tube is too long and extends deep into the overflow, trim it to the proper length. This ensures water flows into the tube without causing a siphoning effect that leads to continuous running.
After making these adjustments, flush the toilet and observe the refill process. Water should flow smoothly into the overflow tube without creating a constant stream.
sbb-itb-6ceaf48
Tools and Parts You'll Need
Required Tools and Parts
Fixing a running toilet doesn’t require a toolbox full of gadgets - just a few basics. You'll need an adjustable wrench and a screwdriver for most repairs. A sponge will come in handy to soak up any leftover water in the tank, while rubber gloves and a bucket will help manage drips when disconnecting water lines.
When it comes to replacement parts, flappers are a common fix and are budget-friendly, typically priced between $5 and $10. If you want an all-in-one solution, consider a universal toilet repair kit, which includes a fill valve, flapper, and other essentials. These kits usually cost around $15 to $30. You can pick up these parts at local hardware stores like Ace Hardware, where the staff can assist you in finding the right fit for your toilet model. If shopping online, reliable brands like Fluidmaster, Korky, and Danco are worth checking out.
"Doing it yourself will save water and plumber's fees." - Ace Hardware
With these tools and parts in hand, you're ready to tackle the most common toilet issues. The upfront cost is small, especially when compared to the long-term savings on water bills.
DIY Repair Costs vs. Water Bill Savings
Fixing a running toilet is not just about convenience - it’s a smart financial move. The cost of parts is minimal, but the savings can be substantial. A running toilet can waste up to 200 gallons of water daily, which adds up to over 6,000 gallons in a month or more than 70,000 gallons in a year. This kind of water waste can increase your monthly bill by $20 to $30, or $240 to $360 annually. For example, one homeowner reported a shocking $250 water bill in March 2024 after a basement toilet ran continuously during a weekend trip.
In contrast, DIY repairs are incredibly cost-effective. Replacing a flapper costs just $4 to $10, meaning you’ll recover your costs in less than a month through water savings. Even a universal repair kit, priced at $15 to $30, will pay for itself within two months. Spending a few dollars now can save you hundreds over the course of a year.
| Repair Type | DIY Parts Cost | Annual Water Savings | Time to Break Even |
|---|---|---|---|
| Flapper Replacement | $4 - $10 | $240 - $360 | Less than 1 month |
| Fill Valve Replacement | $15 - $30 | $240 - $360 | Less than 2 months |
| Universal Repair Kit | $15 - $30 | $240 - $360 | Less than 2 months |
When to Call Sasquatch Plumbing Services Seattle

Sometimes, even the best DIY efforts aren't enough to fix plumbing problems. That’s when it’s time to bring in the professionals.
Signs You Need a Professional Plumber
If you’ve tried straightforward fixes like replacing the flapper or adjusting the float and your toilet still runs, it’s a sign of a deeper issue that needs expert attention. Persistent problems often indicate something more complex than a simple repair.
Water overflowing or rising dangerously close to the rim of the bowl is another red flag. This could point to a hidden clog or a more serious underlying problem. Similarly, visible cracks in the porcelain tank or bowl demand immediate professional help, as these kinds of damages usually can’t be fixed with basic part replacements. Issues with the connection between the tank and the bowl also require expert care.
Recurring clogs might signal pipe damage or even a sewage backup. If your toilet is over 20 years old and constantly breaking down, it might be more economical to replace it instead of dealing with endless repairs. And if you’re facing severe sewage leaks, don’t wait - call a professional immediately.
Finally, if the repair feels beyond your expertise or involves a full toilet installation, it’s best to leave it to trained professionals who can handle the job efficiently.
Why Choose Sasquatch Plumbing Services Seattle
When your plumbing problems go beyond DIY fixes, you need a reliable expert you can trust. That’s where Sasquatch Plumbing Services Seattle comes in.
Specializing in West Seattle plumbing needs, they offer same-day emergency services to ensure you’re never left waiting. Their licensed and insured plumbers provide transparent, upfront pricing before any work begins, so there are no surprises. Typical toilet repairs range from $75 to $400, depending on the complexity of the issue.
Using advanced tools like camera inspections, they can pinpoint the root cause of your plumbing woes. Plus, every service comes with a satisfaction guarantee, so you can rest easy knowing the job will be done right. Whether it’s a running toilet, a full replacement, or structural damage uncovered during your DIY attempt, their experienced team is ready to find the best solution and get your bathroom back in working order.
Conclusion
A running toilet doesn’t have to drain your savings. Most common problems - like a worn-out flapper, an incorrectly adjusted float, or a damaged fill valve - are quick to diagnose and can often be fixed in under an hour for just $10 to $50.
Start with a few straightforward checks: press down on the flapper to see if the water flow stops, lift the float arm to determine if it needs adjustment, or examine the overflow tube for continuous water flow. These simple tests can help pinpoint the issue.
Addressing the problem not only saves water but also lowers your utility bill. A running toilet can waste a surprising amount of water, which adds up fast. DIY repairs are a budget-friendly way to solve the issue and restore peace to your bathroom.
If the problem persists, you spot cracks in the tank or bowl, or the repair seems beyond a simple part replacement, consider calling Sasquatch Plumbing Services Seattle. They offer same-day emergency service with upfront pricing, typically ranging from $75 to $400 depending on the repair.
The key takeaway? Don’t wait. Whether you handle the repair yourself or call in a professional, acting quickly prevents water waste, saves money, and stops that irritating trickling sound for good.
FAQs
How can I check if the flapper is causing my toilet to keep running?
To determine if the flapper is causing the issue, place a few drops of food coloring into the tank water. Let it sit for about 15 minutes without flushing. If you notice the color appearing in the bowl, it indicates the flapper isn't sealing correctly and is likely the source of the leak. Replacing the flapper is an easy and effective way to address this problem.
What tools do I need to fix a toilet that keeps running?
To tackle a running toilet, gather a few essential tools and supplies: an adjustable wrench, pliers, a screwdriver, a sponge, and a bucket. In some cases, you might also need replacement parts such as a flapper, fill valve, or float. These parts are easy to find at most hardware stores and are key for handling common toilet repair tasks.
When is it time to call a plumber for a running toilet?
If your toilet continues to run even after you've tried to fix it, it might be time to bring in a professional plumber. This becomes especially crucial if you're dealing with overflowing water, constant leaks, or suspect that internal components are damaged.
An experienced plumber can identify the problem quickly and make the necessary repairs, helping you avoid water damage and keeping your utility bills from climbing.